Showing posts with label Ant. Show all posts

9a. Gradle upgrade

In this tutorial we will overview basics of Gradle build system.

Step 1: verify what Gradle version you have

$ gradle -version

------------------------------------------------------------
Gradle 2.13
------------------------------------------------------------

Build time:   2016-04-25 04:10:10 UTC
Build number: none
Revision:     3b427b1481e46232107303c90be7b05079b05b1c

Groovy:       2.4.4
Ant:          Apache Ant(TM) version 1.9.6 compiled on June 29 2015
JVM:          1.8.0_77 (Oracle Corporation 25.77-b03)
OS:           Mac OS X 10.11.4 x86_64


Step 2: update to the newest 

if you are missing entirely (on Mac using brew):

install brew on Mac:

ruby -e "$(curl -fsSL https://raw.githubusercontent.com/Homebrew/install/master/install)"

and now install gradle on Mac

brew install gradle

If you are updating (on Mac using brew):

brew update && brew upgrade gradle
...
==> Downloading https://downloads.gradle.org/distributions/gradle-2.1-bin.zip

######################################################################## 100.0%


$ gradle -version
------------------------------------------------------------
Gradle 2.1
------------------------------------------------------------
Build time:   2014-09-08 10:40:39 UTC
Build number: none
Revision:     e6cf70745ac11fa943e19294d19a2c527a669a53
Groovy:       2.3.6
Ant:          Apache Ant(TM) version 1.9.3 compiled on December 23 2013
JVM:          1.8.0_20-ea (Oracle Corporation 25.20-b05)
OS:           Mac OS X 10.9.4 x86_64

$ which 

gradle/usr/local/bin/gradle


If you like this post, please give me your 2 cents ($0.02 litterally) to show token of appreciation and encourage me to write more:
Donate Bitcoins


As an Amazon Associate I earn from qualifying purchases.

9a. Gradle upgrade

In this tutorial we will overview basics of Gradle build system.

Step 1: verify what Gradle version you have

$ gradle -version

------------------------------------------------------------
Gradle 2.13
------------------------------------------------------------

Build time:   2016-04-25 04:10:10 UTC
Build number: none
Revision:     3b427b1481e46232107303c90be7b05079b05b1c

Groovy:       2.4.4
Ant:          Apache Ant(TM) version 1.9.6 compiled on June 29 2015
JVM:          1.8.0_77 (Oracle Corporation 25.77-b03)
OS:           Mac OS X 10.11.4 x86_64


Step 2: update to the newest 

if you are missing entirely (on Mac using brew):

install brew on Mac:

ruby -e "$(curl -fsSL https://raw.githubusercontent.com/Homebrew/install/master/install)"

and now install gradle on Mac

brew install gradle

If you are updating (on Mac using brew):

brew update && brew upgrade gradle
...
==> Downloading https://downloads.gradle.org/distributions/gradle-2.1-bin.zip

######################################################################## 100.0%


$ gradle -version
------------------------------------------------------------
Gradle 2.1
------------------------------------------------------------
Build time:   2014-09-08 10:40:39 UTC
Build number: none
Revision:     e6cf70745ac11fa943e19294d19a2c527a669a53
Groovy:       2.3.6
Ant:          Apache Ant(TM) version 1.9.3 compiled on December 23 2013
JVM:          1.8.0_20-ea (Oracle Corporation 25.20-b05)
OS:           Mac OS X 10.9.4 x86_64

$ which 

gradle/usr/local/bin/gradle


If you like this post, please give me your 2 cents ($0.02 litterally) to show token of appreciation and encourage me to write more:
Donate Bitcoins


As an Amazon Associate I earn from qualifying purchases.

Eclipse not reading ANT env variables

Sometimes you have ANT build.xml that works perfectly from command line but does not execute in Eclipse:

BUILD FAILED
Execute failed: java.io.IOException: Cannot run program "${env.THRIFT_TOOL}": error=2, No such file or directory

When you inspect your build.xml you should have (true for any executable):

<property environment="env"/><property name="thrift.compiler" value="${env.THRIFT_TOOL}"/>


If you inspect your env variable setting, on OSX ~/.profile you should have:

# Thrift tool  - updated: Sept 16, 2014
export THRIFT_TOOL=/usr/local/bin/thrift
export PATH=${THRIFT_TOOL}:${PATH}


Yet Eclipse is not running Ant correctly!

Starting Eclipse from COMMAND LINE fixes the issue:

$ bash -ic /Applications/../Eclipse.app/Contents/MacOS/eclipse 


As an Amazon Associate I earn from qualifying purchases.

Eclipse not reading ANT env variables

Sometimes you have ANT build.xml that works perfectly from command line but does not execute in Eclipse:

BUILD FAILED
Execute failed: java.io.IOException: Cannot run program "${env.THRIFT_TOOL}": error=2, No such file or directory

When you inspect your build.xml you should have (true for any executable):

<property environment="env"/><property name="thrift.compiler" value="${env.THRIFT_TOOL}"/>


If you inspect your env variable setting, on OSX ~/.profile you should have:

# Thrift tool  - updated: Sept 16, 2014
export THRIFT_TOOL=/usr/local/bin/thrift
export PATH=${THRIFT_TOOL}:${PATH}


Yet Eclipse is not running Ant correctly!

Starting Eclipse from COMMAND LINE fixes the issue:

$ bash -ic /Applications/../Eclipse.app/Contents/MacOS/eclipse 


As an Amazon Associate I earn from qualifying purchases.

Ant tool on Mac Maverick 10.9.2

Apple as usually is playing a game with developers:

$ ant clean
-bash: ant: command not found


$ xcode-select --install
xcode-select: note: install requested for command line developer tools
- Agree
- Finding Software
- Server not available 


Another way:

$ which brew
- nothing
$ ruby -e "$(curl -fsSL https://raw.github.com/Homebrew/homebrew/go/install)"

$ brew install ant
==> Downloading http://www.apache.org/dyn/closer.cgi?path=ant/binaries/apache-ant-1.9.3-bin.tar.gz
Error: Failed to download resource "ant"
Couldn't determine mirror, try again later.

Trying another approach:

@ ~ $ brew install homebrew/dupes/ant
Cloning into '/usr/local/Library/Taps/homebrew-dupes'...
error: RPC failed; result=7, HTTP code = 0
fatal: The remote end hung up unexpectedly
@ ~ $ ant

-bash: ant: command not found

Another approach:
got to http://ant.apache.org/bindownload.cgi
for half a day I was getting server error, but finally in the evening I was able to download:

/usr/local/apache-ant-1.9.3-bin.zip
upzip it
$ cd /usr/local/apache-ant-1.9.3/bin
$ ./ant
Buildfile: build.xml does not exist!
WORKS!
$ edit ~/.profile

Add this to your .profile file

# ANT
export ANT_HOME=/usr/local/apache-ant-1.9.3
export PATH=${PATH}:${ANT_HOME}/bin

Save and Restart terminal 

Now ant command works from any directory.


As an Amazon Associate I earn from qualifying purchases.

Ant tool on Mac Maverick 10.9.2

Apple as usually is playing a game with developers:

$ ant clean
-bash: ant: command not found


$ xcode-select --install
xcode-select: note: install requested for command line developer tools
- Agree
- Finding Software
- Server not available 


Another way:

$ which brew
- nothing
$ ruby -e "$(curl -fsSL https://raw.github.com/Homebrew/homebrew/go/install)"

$ brew install ant
==> Downloading http://www.apache.org/dyn/closer.cgi?path=ant/binaries/apache-ant-1.9.3-bin.tar.gz
Error: Failed to download resource "ant"
Couldn't determine mirror, try again later.

Trying another approach:

@ ~ $ brew install homebrew/dupes/ant
Cloning into '/usr/local/Library/Taps/homebrew-dupes'...
error: RPC failed; result=7, HTTP code = 0
fatal: The remote end hung up unexpectedly
@ ~ $ ant

-bash: ant: command not found

Another approach:
got to http://ant.apache.org/bindownload.cgi
for half a day I was getting server error, but finally in the evening I was able to download:

/usr/local/apache-ant-1.9.3-bin.zip
upzip it
$ cd /usr/local/apache-ant-1.9.3/bin
$ ./ant
Buildfile: build.xml does not exist!
WORKS!
$ edit ~/.profile

Add this to your .profile file

# ANT
export ANT_HOME=/usr/local/apache-ant-1.9.3
export PATH=${PATH}:${ANT_HOME}/bin

Save and Restart terminal 

Now ant command works from any directory.


As an Amazon Associate I earn from qualifying purchases.

Ant: TAR and GZIP task

You can create an ant task called, tar task, to compress a directory instead of manually creating the tar in command line.
http://ant.apache.org/manual/CoreTasks/tar.html Insert below text in your build.xml file for your project:
<tar destfile="${dist}/manual.tar" basedir="htdocs/manual"/>
<gzip destfile="${dist}/manual.tar.gz" src="${dist}/manual.tar"/>


As an Amazon Associate I earn from qualifying purchases.

Ant: TAR and GZIP task

You can create an ant task called, tar task, to compress a directory instead of manually creating the tar in command line.
http://ant.apache.org/manual/CoreTasks/tar.html Insert below text in your build.xml file for your project:
<tar destfile="${dist}/manual.tar" basedir="htdocs/manual"/>
<gzip destfile="${dist}/manual.tar.gz" src="${dist}/manual.tar"/>


As an Amazon Associate I earn from qualifying purchases.

Maven, GWT, and Eclipse round 2

So I've definitely made some progress in the Maven, GWT, and Eclipse integration. Below would be a working sample starting from a GWT project started using the google eclipse plugin.

Prerequisites:
Eclipse 3.4
Google Eclipse Plugin
m2eclipse plugin

Create your gwt project:
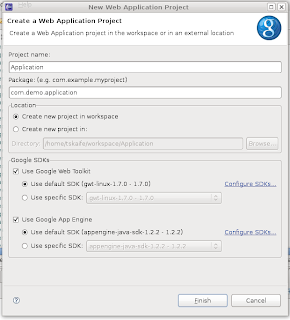
Create a pom for your project:
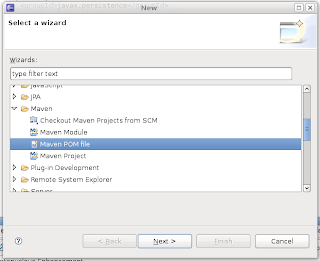

Edit the pom to look like this (profiles and resource filtering are definitely not needed and can be removed) and add any other jars you may need for your project:

<project xmlns="http://maven.apache.org/POM/4.0.0" xmlns:xsi="http://www.w3.org/2001/XMLSchema-instance"
xsi:schemaLocation="http://maven.apache.org/POM/4.0.0 http://maven.apache.org/maven-v4_0_0.xsd">
<modelVersion>4.0.0</modelVersion>
<groupId>com.demo.application</groupId>
<artifactId>Application</artifactId>
<version>0.0.1-SNAPSHOT</version>
<build>
<sourceDirectory>src</sourceDirectory>
<outputDirectory>war/WEB-INF/classes</outputDirectory>
<testSourceDirectory>test</testSourceDirectory>
<testOutputDirectory>target/test-classes</testOutputDirectory>
<resources>
<resource>
<filtering>true</filtering>
<directory>src</directory>
<includes>
<!--
This will include all files in the root source like
log4j.properties or applicationContext.xml
-->
<include>*.*</include>
<!--
This will include all files in client: 1. so this project can be
inherited by another project (needs java files) 2. will include
image files for image bundles
-->
<include>**/client/**</include>
<!-- This will include any css and image files in the public folder -->
<include>**/public/**</include>
<include>**/*.gwt.xml</include>
</includes>
</resource>
</resources>
<filters>
<!--
This tells which file to use for filtering, ${target} gets replaced
by the target property specified in your profile
-->
<filter>src/${target}.properties</filter>
</filters>
<plugins>
<plugin>
<artifactId>maven-compiler-plugin</artifactId>
<configuration>
<source>1.5</source>
<target>1.5</target>
<encoding>UTF-8</encoding>
</configuration>
</plugin>
<plugin>
<!--
This plugin will copy dependencies into the right outputDirectory
-->
<groupId>org.apache.maven.plugins</groupId>
<artifactId>maven-dependency-plugin</artifactId>
<configuration>
<outputDirectory>war/WEB-INF/lib</outputDirectory>
<overWriteReleases>true</overWriteReleases>
<overWriteSnapshots>true</overWriteSnapshots>
<overWriteIfNewer>true</overWriteIfNewer>
</configuration>
<executions>
<execution>
<id>copy-dependencies</id>
<phase>package</phase>
<goals>
<goal>copy-dependencies</goal>
</goals>
</execution>
</executions>
</plugin>
<plugin>
<groupId>org.apache.maven.plugins</groupId>
<artifactId>maven-resources-plugin</artifactId>
<version>2.3</version>
<configuration>
<encoding>UTF-8</encoding>
</configuration>
</plugin>
</plugins>
</build>
<repositories>
<repository>
<id>google-maven-repository</id>
<name>Google Maven Repository</name>
<url>http://google-maven-repository.googlecode.com/svn/repository/</url>
</repository>
</repositories>
<dependencies>
<dependency>
<groupId>com.google.appengine</groupId>
<artifactId>appengine-api-1.0-sdk</artifactId>
<version>1.2.1</version>
</dependency>
<dependency>
<groupId>com.google.appengine.orm</groupId>
<artifactId>datanucleus-appengine</artifactId>
<version>1.0.2.final</version>
</dependency>
<dependency>
<groupId>org.datanucleus</groupId>
<artifactId>datanucleus-core</artifactId>
<version>1.1.0</version>
<exclusions>
<exclusion>
<groupId>javax.transaction</groupId>
<artifactId>transaction-api</artifactId>
</exclusion>
</exclusions>
</dependency>
<dependency>
<groupId>org.datanucleus</groupId>
<artifactId>datanucleus-jpa</artifactId>
<version>1.1.0</version>
</dependency>
<dependency>
<groupId>org.apache.geronimo.specs</groupId>
<artifactId>geronimo-jta_1.1_spec</artifactId>
<version>1.1.1</version>
</dependency>
<dependency>
<groupId>org.apache.geronimo.specs</groupId>
<artifactId>geronimo-jpa_3.0_spec</artifactId>
<version>1.1.1</version>
</dependency>
<dependency>
<groupId>com.google.gwt</groupId>
<artifactId>gwt-servlet</artifactId>
<version>1.7.0</version>
</dependency>
<dependency>
<groupId>com.google.gwt</groupId>
<artifactId>gwt-user</artifactId>
<version>1.7.0</version>
</dependency>
<dependency>
<groupId>javax.jdo</groupId>
<artifactId>jdo2-api</artifactId>
<version>2.3-ea</version>
<exclusions>
<exclusion>
<groupId>javax.transaction</groupId>
<artifactId>transaction-api</artifactId>
</exclusion>
</exclusions>
</dependency>
<dependency>
<groupId>javax.transaction</groupId>
<artifactId>jta</artifactId>
<version>1.1</version>
</dependency>
</dependencies>
<profiles>
<profile>
<id>local</id>
<properties>
<target>local</target>
</properties>
</profile>
<profile>
<id>prod</id>
<properties>
<target>prod</target>
</properties>
</profile>
</profiles>
</project>


You'll have to install some of the jars into maven manually, they aren't really keeping up to date with these things. For the datanucleus-appengine-1.0.2.final.jar you have to use the one that was placed in the lib folder and run this command

mvn install:install-file -DgroupId=com.google.appengine.orm -DartifactId=datanucleus-appengine -Dversion=1.0.2.final -Dpackaging=jar -Dfile=/path/to/file

At this time I would enable maven (I got some error message but just hit ok):

If you are using profiles (you probably have an error in your project at this point) tell maven which active profile to use:

You'll get a message if you want maven to update your project, hit ok.
You're done, just ignore the warning about the missing gwt-servlet.jar, it will be there, just named differently.

now we just need to make an ant build.xml to make compiling, and deploying easy.

<project name="Application" default="java_compile" basedir=".">

<property file="./src/local.properties" />

<target name="java_compile" description="Java compile, filter resources, copy jars">
<echo>Make sure you have set up Maven Executable in ./src/local.properties</echo>
<echo>Your mvn exe is set to ${MAVEN_EXEC}</echo>
<!-- process-resources filters the files in the resources directory and copies them to target/classes -->
<!-- dependency:copy-dependencies copies the dependencies to the target/dependency folder -->
<delete dir="war/WEB-INF/lib" />
<exec taskname="compile project" dir="${basedir}" executable="${MAVEN_EXEC}">
<arg line="clean process-resources compile dependency:copy-dependencies -P local" />
</exec>
</target>

<path id="project.class.path">
<pathelement location="war/WEB-INF/classes" />
<pathelement location="${gwt.sdk}/gwt-user.jar" />
<fileset dir="${gwt.sdk}" includes="gwt-dev*.jar" />
<!-- Add any additional non-server libs (such as JUnit) -->
<fileset dir="war/WEB-INF/lib" includes="**/*.jar" />
</path>

<target name="gwt_compile" description="GWT compile to JavaScript" depends="java_compile">
<java failonerror="true" fork="true" classname="com.google.gwt.dev.Compiler">
<classpath>
<pathelement location="src" />
<path refid="project.class.path" />
</classpath>
<!-- add jvmarg -Xss16M or similar if you see a StackOverflowError -->
<jvmarg line="-Xmx512M" />
<!-- Additional arguments like -style PRETTY or -logLevel DEBUG -->
<arg value="com.demo.application.Application" />
</java>
</target>

<target name="create_war" depends="gwt_compile">
<echo>Creating the war file in target/Application.war</echo>
<zip destfile="target/Application.war" basedir="war" encoding="UTF8"/>
</target>
</project>


then our local.properties file needs to look something like this

gwt.sdk=/path/to/gwt-os-1.7.0
MAVEN_EXEC=/path/to/mvn.exe


Once that is done you need to run "ant java_compile" to copy the jars into the war/WEB-INF/lib folder. And every time you change the dependencies you'd want to run "ant java_compile"

Now if you ever want to simply create a war file without using eclipse you can just run "ant create_war"


As an Amazon Associate I earn from qualifying purchases.

Maven, GWT, and Eclipse round 2

So I've definitely made some progress in the Maven, GWT, and Eclipse integration. Below would be a working sample starting from a GWT project started using the google eclipse plugin.

Prerequisites:
Eclipse 3.4
Google Eclipse Plugin
m2eclipse plugin

Create your gwt project:

Create a pom for your project:
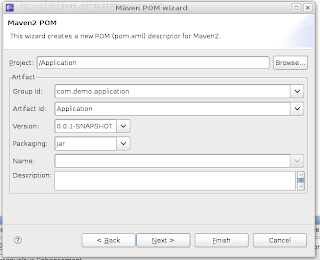

Edit the pom to look like this (profiles and resource filtering are definitely not needed and can be removed) and add any other jars you may need for your project:

<project xmlns="http://maven.apache.org/POM/4.0.0" xmlns:xsi="http://www.w3.org/2001/XMLSchema-instance"
xsi:schemaLocation="http://maven.apache.org/POM/4.0.0 http://maven.apache.org/maven-v4_0_0.xsd">
<modelVersion>4.0.0</modelVersion>
<groupId>com.demo.application</groupId>
<artifactId>Application</artifactId>
<version>0.0.1-SNAPSHOT</version>
<build>
<sourceDirectory>src</sourceDirectory>
<outputDirectory>war/WEB-INF/classes</outputDirectory>
<testSourceDirectory>test</testSourceDirectory>
<testOutputDirectory>target/test-classes</testOutputDirectory>
<resources>
<resource>
<filtering>true</filtering>
<directory>src</directory>
<includes>
<!--
This will include all files in the root source like
log4j.properties or applicationContext.xml
-->
<include>*.*</include>
<!--
This will include all files in client: 1. so this project can be
inherited by another project (needs java files) 2. will include
image files for image bundles
-->
<include>**/client/**</include>
<!-- This will include any css and image files in the public folder -->
<include>**/public/**</include>
<include>**/*.gwt.xml</include>
</includes>
</resource>
</resources>
<filters>
<!--
This tells which file to use for filtering, ${target} gets replaced
by the target property specified in your profile
-->
<filter>src/${target}.properties</filter>
</filters>
<plugins>
<plugin>
<artifactId>maven-compiler-plugin</artifactId>
<configuration>
<source>1.5</source>
<target>1.5</target>
<encoding>UTF-8</encoding>
</configuration>
</plugin>
<plugin>
<!--
This plugin will copy dependencies into the right outputDirectory
-->
<groupId>org.apache.maven.plugins</groupId>
<artifactId>maven-dependency-plugin</artifactId>
<configuration>
<outputDirectory>war/WEB-INF/lib</outputDirectory>
<overWriteReleases>true</overWriteReleases>
<overWriteSnapshots>true</overWriteSnapshots>
<overWriteIfNewer>true</overWriteIfNewer>
</configuration>
<executions>
<execution>
<id>copy-dependencies</id>
<phase>package</phase>
<goals>
<goal>copy-dependencies</goal>
</goals>
</execution>
</executions>
</plugin>
<plugin>
<groupId>org.apache.maven.plugins</groupId>
<artifactId>maven-resources-plugin</artifactId>
<version>2.3</version>
<configuration>
<encoding>UTF-8</encoding>
</configuration>
</plugin>
</plugins>
</build>
<repositories>
<repository>
<id>google-maven-repository</id>
<name>Google Maven Repository</name>
<url>http://google-maven-repository.googlecode.com/svn/repository/</url>
</repository>
</repositories>
<dependencies>
<dependency>
<groupId>com.google.appengine</groupId>
<artifactId>appengine-api-1.0-sdk</artifactId>
<version>1.2.1</version>
</dependency>
<dependency>
<groupId>com.google.appengine.orm</groupId>
<artifactId>datanucleus-appengine</artifactId>
<version>1.0.2.final</version>
</dependency>
<dependency>
<groupId>org.datanucleus</groupId>
<artifactId>datanucleus-core</artifactId>
<version>1.1.0</version>
<exclusions>
<exclusion>
<groupId>javax.transaction</groupId>
<artifactId>transaction-api</artifactId>
</exclusion>
</exclusions>
</dependency>
<dependency>
<groupId>org.datanucleus</groupId>
<artifactId>datanucleus-jpa</artifactId>
<version>1.1.0</version>
</dependency>
<dependency>
<groupId>org.apache.geronimo.specs</groupId>
<artifactId>geronimo-jta_1.1_spec</artifactId>
<version>1.1.1</version>
</dependency>
<dependency>
<groupId>org.apache.geronimo.specs</groupId>
<artifactId>geronimo-jpa_3.0_spec</artifactId>
<version>1.1.1</version>
</dependency>
<dependency>
<groupId>com.google.gwt</groupId>
<artifactId>gwt-servlet</artifactId>
<version>1.7.0</version>
</dependency>
<dependency>
<groupId>com.google.gwt</groupId>
<artifactId>gwt-user</artifactId>
<version>1.7.0</version>
</dependency>
<dependency>
<groupId>javax.jdo</groupId>
<artifactId>jdo2-api</artifactId>
<version>2.3-ea</version>
<exclusions>
<exclusion>
<groupId>javax.transaction</groupId>
<artifactId>transaction-api</artifactId>
</exclusion>
</exclusions>
</dependency>
<dependency>
<groupId>javax.transaction</groupId>
<artifactId>jta</artifactId>
<version>1.1</version>
</dependency>
</dependencies>
<profiles>
<profile>
<id>local</id>
<properties>
<target>local</target>
</properties>
</profile>
<profile>
<id>prod</id>
<properties>
<target>prod</target>
</properties>
</profile>
</profiles>
</project>


You'll have to install some of the jars into maven manually, they aren't really keeping up to date with these things. For the datanucleus-appengine-1.0.2.final.jar you have to use the one that was placed in the lib folder and run this command

mvn install:install-file -DgroupId=com.google.appengine.orm -DartifactId=datanucleus-appengine -Dversion=1.0.2.final -Dpackaging=jar -Dfile=/path/to/file

At this time I would enable maven (I got some error message but just hit ok):
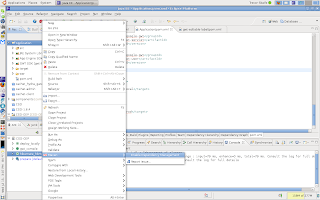
If you are using profiles (you probably have an error in your project at this point) tell maven which active profile to use:
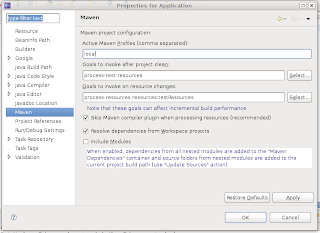
You'll get a message if you want maven to update your project, hit ok.
You're done, just ignore the warning about the missing gwt-servlet.jar, it will be there, just named differently.

now we just need to make an ant build.xml to make compiling, and deploying easy.

<project name="Application" default="java_compile" basedir=".">

<property file="./src/local.properties" />

<target name="java_compile" description="Java compile, filter resources, copy jars">
<echo>Make sure you have set up Maven Executable in ./src/local.properties</echo>
<echo>Your mvn exe is set to ${MAVEN_EXEC}</echo>
<!-- process-resources filters the files in the resources directory and copies them to target/classes -->
<!-- dependency:copy-dependencies copies the dependencies to the target/dependency folder -->
<delete dir="war/WEB-INF/lib" />
<exec taskname="compile project" dir="${basedir}" executable="${MAVEN_EXEC}">
<arg line="clean process-resources compile dependency:copy-dependencies -P local" />
</exec>
</target>

<path id="project.class.path">
<pathelement location="war/WEB-INF/classes" />
<pathelement location="${gwt.sdk}/gwt-user.jar" />
<fileset dir="${gwt.sdk}" includes="gwt-dev*.jar" />
<!-- Add any additional non-server libs (such as JUnit) -->
<fileset dir="war/WEB-INF/lib" includes="**/*.jar" />
</path>

<target name="gwt_compile" description="GWT compile to JavaScript" depends="java_compile">
<java failonerror="true" fork="true" classname="com.google.gwt.dev.Compiler">
<classpath>
<pathelement location="src" />
<path refid="project.class.path" />
</classpath>
<!-- add jvmarg -Xss16M or similar if you see a StackOverflowError -->
<jvmarg line="-Xmx512M" />
<!-- Additional arguments like -style PRETTY or -logLevel DEBUG -->
<arg value="com.demo.application.Application" />
</java>
</target>

<target name="create_war" depends="gwt_compile">
<echo>Creating the war file in target/Application.war</echo>
<zip destfile="target/Application.war" basedir="war" encoding="UTF8"/>
</target>
</project>


then our local.properties file needs to look something like this

gwt.sdk=/path/to/gwt-os-1.7.0
MAVEN_EXEC=/path/to/mvn.exe


Once that is done you need to run "ant java_compile" to copy the jars into the war/WEB-INF/lib folder. And every time you change the dependencies you'd want to run "ant java_compile"

Now if you ever want to simply create a war file without using eclipse you can just run "ant create_war"


As an Amazon Associate I earn from qualifying purchases.

Compiling GWT in PRETTY mode with Ant

Here is how we are currently compiling our GWT project (version 1.5.3):

< java taskname="GWT compile" classpathref="class_path"
classname="com.google.gwt.dev.GWTCompiler" fork="true"
maxmemory="512m">
   < jvmarg line="-verbose ${JVM_ARG_START}">
   < arg line="-logLevel WARN -XdisableAggressiveOptimization -out www com.ucc.csd.CSD">
< /java>
In order to compile in PRETTY (or any other mode) is to add the -style argument to the arg tag followed by PRETTY.

< java taskname="GWT compile" classpathref="class_path"
classname="com.google.gwt.dev.GWTCompiler" fork="true"
maxmemory="512m">
   < jvmarg line="-verbose ${JVM_ARG_START}">
   < arg line="-logLevel WARN -XdisableAggressiveOptimization -out www com.ucc.csd.CSD -style PRETTY">
< /java>


As an Amazon Associate I earn from qualifying purchases.

Compiling GWT in PRETTY mode with Ant

Here is how we are currently compiling our GWT project (version 1.5.3):

< java taskname="GWT compile" classpathref="class_path"
classname="com.google.gwt.dev.GWTCompiler" fork="true"
maxmemory="512m">
&nbsp&nbsp < jvmarg line="-verbose ${JVM_ARG_START}">
&nbsp&nbsp < arg line="-logLevel WARN -XdisableAggressiveOptimization -out www com.ucc.csd.CSD">
&lt /java&gt

In order to compile in PRETTY (or any other mode) is to add the -style argument to the arg tag followed by PRETTY.

< java taskname="GWT compile" classpathref="class_path"
classname="com.google.gwt.dev.GWTCompiler" fork="true"
maxmemory="512m">
&nbsp&nbsp < jvmarg line="-verbose ${JVM_ARG_START}">
&nbsp&nbsp < arg line="-logLevel WARN -XdisableAggressiveOptimization -out www com.ucc.csd.CSD -style PRETTY">
< /java>


As an Amazon Associate I earn from qualifying purchases.

GWT: Ant classpath in build.xml

The variables are set in my_sys_name.properties file:

...

<property file=".\\src\\main\\resources\\${user.name}.properties" />

<path id="class_path">

<pathelement path=".\\src" />

<pathelement path=".\\src\\main\\java" />

<pathelement path=".\\target\\classes\\" />

<pathelement location="${GWT_DEV_JAR}" />


<fileset dir="${GWT_SERVLET_PATH}">

<include name="*.jar" />

fileset>


<fileset dir="${GWT_USER_PATH}">

<include name="*.jar" />

fileset>


<fileset dir="${WAR_EXPLODED}\\WEB-INF\\lib">

<include name="*.jar" />

fileset>

path>

...


As an Amazon Associate I earn from qualifying purchases.

GWT: Ant classpath in build.xml

The variables are set in my_sys_name.properties file:

...

<property file=".\\src\\main\\resources\\${user.name}.properties" />

<path id="class_path">

<pathelement path=".\\src" />

<pathelement path=".\\src\\main\\java" />

<pathelement path=".\\target\\classes\\" />

<pathelement location="${GWT_DEV_JAR}" />


<fileset dir="${GWT_SERVLET_PATH}">

<include name="*.jar" />

fileset>


<fileset dir="${GWT_USER_PATH}">

<include name="*.jar" />

fileset>


<fileset dir="${WAR_EXPLODED}\\WEB-INF\\lib">

<include name="*.jar" />

fileset>

path>

...


As an Amazon Associate I earn from qualifying purchases.

Axis: building using ant


<!-- Generate WSDL -->
    <target name="generateAuthenticationWSDL" depends="compile">
      <axis-java2wsdl 
        classname="com.hmco.morse.authentication.service.RemoteAuthenticationService" 
        namespace="urn:AuthenticationWS
        location="${soap.service}/AuthenticationWS" 
        output="${project.config.dir}/AuthenticationWS.wsdl">
        <mapping namespace="urn:AuthenticationWSpackage="com.hmco.morse.authentication.service"/>
      </axis-java2wsdl>
    </target>

    <!-- Generate WSDL -->
    <target name="generateAuthenticationWrappedWSDL" depends="compile">
      <axis-java2wsdl 
        classname="com.hmco.morse.authentication.service.RemoteAuthenticationService" 
        namespace="urn:AuthenticationWS
        location="${soap.service}/AuthenticationWS" 
        output="${project.config.dir}/AuthenticationWS.wsdl"
        style="wrapped">
        <mapping namespace="urn:AuthenticationWSpackage="com.hmco.morse.authentication.service"/>
      </axis-java2wsdl>
    </target>

    <!-- Generate Client And Move Descriptors -->
    <target name="generateAuthenticationClient">
      <axis-wsdl2java 
        url="${project.config.dir}/AuthenticationWS.wsdl" 
        output="${java2wsdl.output.dir}" 
        deployscope="request" 
        serverSide="yes"
      verbose="true" 
      helpergen="false">
      <mapping namespace="urn:AuthenticationWSpackage="com.hmco.morse.authentication.service"/>
    </axis-wsdl2java>
    <antcall target="moveAxisDescriptors"/>
    </target>

  <target name="moveAxisDescriptors">
    <echo message="moving: ${java2wsdl.output.dir}/com/hmco/morse/authentication/service/deploy.wsdd"/>
    <move file="${java2wsdl.output.dir}/com/hmco/morse/authentication/service/deploy.wsdd" todir="${project.deploy.dir}" failonerror="false"/>
    <echo message="moving: ${java2wsdl.output.dir}/com/hmco/morse/authentication/service/undeploy.wsdd"/>
    <move file="${java2wsdl.output.dir}/com/hmco/morse/authentication/service/undeploy.wsdd" todir="${project.deploy.dir}" failonerror="false"/>
  </target>


As an Amazon Associate I earn from qualifying purchases.

Axis: building using ant


<!-- Generate WSDL -->
    <target name="generateAuthenticationWSDL" depends="compile">
      <axis-java2wsdl 
        classname="com.hmco.morse.authentication.service.RemoteAuthenticationService" 
        namespace="urn:AuthenticationWS
        location="${soap.service}/AuthenticationWS" 
        output="${project.config.dir}/AuthenticationWS.wsdl">
        <mapping namespace="urn:AuthenticationWSpackage="com.hmco.morse.authentication.service"/>
      </axis-java2wsdl>
    </target>

    <!-- Generate WSDL -->
    <target name="generateAuthenticationWrappedWSDL" depends="compile">
      <axis-java2wsdl 
        classname="com.hmco.morse.authentication.service.RemoteAuthenticationService" 
        namespace="urn:AuthenticationWS
        location="${soap.service}/AuthenticationWS" 
        output="${project.config.dir}/AuthenticationWS.wsdl"
        style="wrapped">
        <mapping namespace="urn:AuthenticationWSpackage="com.hmco.morse.authentication.service"/>
      </axis-java2wsdl>
    </target>

    <!-- Generate Client And Move Descriptors -->
    <target name="generateAuthenticationClient">
      <axis-wsdl2java 
        url="${project.config.dir}/AuthenticationWS.wsdl" 
        output="${java2wsdl.output.dir}" 
        deployscope="request" 
        serverSide="yes"
      verbose="true" 
      helpergen="false">
      <mapping namespace="urn:AuthenticationWSpackage="com.hmco.morse.authentication.service"/>
    </axis-wsdl2java>
    <antcall target="moveAxisDescriptors"/>
    </target>

  <target name="moveAxisDescriptors">
    <echo message="moving: ${java2wsdl.output.dir}/com/hmco/morse/authentication/service/deploy.wsdd"/>
    <move file="${java2wsdl.output.dir}/com/hmco/morse/authentication/service/deploy.wsdd" todir="${project.deploy.dir}" failonerror="false"/>
    <echo message="moving: ${java2wsdl.output.dir}/com/hmco/morse/authentication/service/undeploy.wsdd"/>
    <move file="${java2wsdl.output.dir}/com/hmco/morse/authentication/service/undeploy.wsdd" todir="${project.deploy.dir}" failonerror="false"/>
  </target>


As an Amazon Associate I earn from qualifying purchases.

apt quotation..