Showing posts with label by David Wolverton. Show all posts

Using TINY_INT for Java Boolean types with Hibernate

>>We are using Spring 2.0 and Hibernate 3.2 with a MySQL 5 database.

THE PROBLEM: By default Hibernate persists properties that are of Java Boolean or boolean type as CHAR type with values 0 and 1 in our MySQL database. This is efficient, but when we want to look at the database using our GUI tools, these values both display as the same meaningless box character. This is because the ASCII values 0 and 1, both represent non-printable characters.

THE SOLUTION: If we force Hibernate to make these columns TINY_INT type, our tools will display the values correctly as “0” and “1”. Hibernate allows us to do this by creating a custom type and assigning it to all of our boolean properties. Here’s how:

1. Create a custom Hibernate type. We extend Hibernate’s abstract BooleanType and override a few methods to customize it for our needs.

OneZeroBoolean.java

package com.example.model;

import java.sql.PreparedStatement;
import java.sql.ResultSet;
import java.sql.SQLException;
import java.sql.Types;

import org.hibernate.dialect.Dialect;
import org.hibernate.type.BooleanType;

public class OneZeroBoolean extends BooleanType
{
private static final long serialVersionUID = 1L;

public Object get(ResultSet rs, String name) throws SQLException
{
if (rs.getObject(name) == null)
return null;
int code = rs.getInt(name);
return code != 0;
}

public void set(PreparedStatement st, Object value, int index) throws SQLException
{
if (value == null)
st.setObject(index, null);
else
st.setInt(index, Boolean.TRUE.equals(value) ? 1 : 0);
}

public int sqlType()
{
return Types.TINYINT;
}

public String objectToSQLString(Object value, Dialect dialect) throws Exception
{
return ((Boolean)value).booleanValue() ? "1" : "0";
}

public Object stringToObject(String xml) throws Exception
{
if ("0".equals(xml))
{
return Boolean.FALSE;
} else
{
return Boolean.TRUE;
}
}
}

2. Register this new type with Hibernate. We are using annotations for our hibernate configuration, so this is done in the package-info.java file in the package where our entity classes are defined. Here register our new type under the name “onezero-boolean”. You can use any name you like (unless it’s already used by hibernate). We will reference this name later when we declare the boolean properties themselves.

package-info.java

@TypeDefs( { @TypeDef(name = "onezero-boolean", typeClass = OneZeroBoolean.class) })
package com.example.model;

import org.hibernate.annotations.TypeDefs;
import org.hibernate.annotations.TypeDef;

NOTE: In order to use these package-level annotations we need to tell the Hibernate configuration to look for them. Your configuration may be in hibernate.cfg.xml or you may be doing it in Spring. Here are examples from both…

Hibernate.cfg.xml: Add a mapping within <session-factory> telling hibernate to look for package-level annotations in the specified package.

hibernate.cfg.xml

<hibernate-configuration>
<session-factory>
...
<mapping package="com.example.model" />
...

Spring: Spring provides some helpers to configure a hibernate session factory as an alternative to specifying everything in hibernate.cfg.xml. In Spring 2.0 it’s the org.springframework.orm.hibernate3.annotation.AnnotationSessionFactoryBean class. Here is a snippet of the configuration including the extra piece needed for package annotations:

applicationContext.xml

<bean id="sessionFactory"
class="org.springframework.orm.hibernate3.annotation.AnnotationSessionFactoryBean">
<property name="dataSource" ref="dataSource" />
<property name="hibernateProperties">
<props>
<prop key="hibernate.dialect">${hibernate.dialect}</prop>
<prop key="hibernate.show_sql">${hibernate.show_sql}</prop>
</props>
</property>
<!-- This property tells it to look at our package-level annotations -->
<property name="annotatedPackages">
<list>
<value>com.example.model</value>
</list>
</property>
<property name="annotatedClasses">
<list>
<value>com.example.model.Entity1</value>
<value>com.example.model.Entity2</value>
...
</list>
</property>
</bean>

3. Where ever boolean or Boolean type properties are declared in the entity classes, tell hibernate to use our new custom type. This is done with the hibernate @Type annotation; just specify the name that we used to register our custom type above.

Entity1.java

package com.example.model;
import javax.persistence.Entity;
import javax.persistence.GeneratedValue;
import javax.persistence.GenerationType;
import javax.persistence.Id;

import org.hibernate.annotations.Type;

@Entity
public class Entity1
{
@Id
@GeneratedValue(strategy = GenerationType.AUTO)
private Long id;

private String name;

@Type(type="onezero-boolean")
private boolean active;

//Getters and Setters
...
}

That’s all there is to it. This same type can be applied to any and/or all boolean properties in our entities. Hibernate schema generation will generate TINY_INT columns for us and hibernate persistence will store boolean values as 1(true) and 0(false) in those columns.

GWT Image Dimensions and Pre-loading

I've run across this problem several times when programming in both JavaScript and in GWT (Google Web Toolkit). I need to fit an image in a specific space while maintaining aspect ratio, but I don't know the image dimensions.

For example I have a 100px by 100px space in my layout for a users profile picture, but the actual picture might be 300 x 200 or 200 x 400 or any other size. So half the time need to contrain the width of the image to get the correct aspect ratio, and half the time the height.

Luckily, we can count on browsers supporting the image "onload" event which is fired when the image fully loads. If we have not given the image any size constraints, the browser will display the image full size and we will be able to get it's dimensions at that point. An finally we can use those to resize it.

This method works, but it can get pretty complicated to try to hide the image so that it doesn't mess up the layout while it's loading and deal with race conditions that come with cashed images as well as several other cross-browser support issues. To make all of this much easier for us all, there is an open-source utility written for GWT that wraps all of the messy details in a simple and reliable interface.

The utility can be found at http://code.google.com/p/gwt-image-loader/. There are good examples on the site, but here's a preview.

To solve my problem of the 100px by 100px profile space, I have two options.

1) Have the ImagePreloader tell me what the image dimensions are and then resize my profile picture.

ImagePreloader.load(<IMAGE URL>, new ImageLoadHander() {
public void imageLoaded(ImageLoadEvent event) {
if (!event.isLoadFailed()) {
int originalWidth = event.getDimensions().getWidth();
int originalHeight = event.getDimensions().getHeight();

//add my logic here to resize image to fit in 100x100 space
}
}
});

2) Let the utility take care of this for me. Use the FitImage class which is a subclass of Image that allows me to set the maximum width and height, just like I want to do in my example. The image will automatically resize it self to fit within the 100 by 100 box while maintaining aspect ratio.

FitImage image = new FitImage(<IMAGE URL>, 100, 100);

If this sounds like something you could use, check it out (http://code.google.com/p/gwt-image-loader/). It's free and open source.

Transparency with CSS and GWT

It's simple to make transparent elements in HTML. Just use CSS. Even IE6 supports it.

Say we want an image to have 25% transparency...

The standard CSS property is

opacity: 0.25;

but IE and some older browsers have different ways of specifying it, so you probably want to use them all to cover your bases

opacity: 0.25; //css standard
filter:alpha(opacity=25); //ie (note that 50% is 25 here, not .25)
-moz-opacity:0.25; //very old mozilla/netscape browsers
-khtml-opacity: 0.25; //very old safari browsers

Here is what it might look like in GWT

public void setOpacity(Element element, double opacity) {
if (opacity > .995) {
element.getStyle().setProperty("opacity", "");
element.getStyle().setProperty("filter", "");
element.getStyle().setProperty("-moz-opacity", "");
element.getStyle().setProperty("-khtml-opacity", "");
} else {
String s = Integer.toString((int) Math.round(opacity * 100));
String sDecimal = (s.length() == 1 ? ".0" : ".") + s;
element.getStyle().setProperty("opacity", sDecimal);
element.getStyle().setProperty("filter", "alpha(opacity=" + s + ")");
element.getStyle().setProperty("-moz-opacity", sDecimal);
element.getStyle().setProperty("-khtml-opacity", sDecimal);
}
}

Java ImageIO and GIF

I'm working on a project where users can upload images in JPEG, PNG and GIF formats and we resize the images using Java's built-in ImageIO API. Unfotunately, there's some confusing issues with GIF support. Using Java 1.5, GIF images can easily be read, but writing GIFs is not supported. This apparently has to do with CompuServe's patent on the GIF format.

The good news is that the patent recently ran out, so we can now freely write images to GIF format with ImageIO.

We have two simple options to make this work--either upgrade our project to Java 1.6 or include a plugin JAR that adds GIF support (for example com.sun.imageio.plugins.gif for Java 1.4 and above).

References:

Twitter Search URLs

You can bookmark or create a link to any search on Twitter. Just do the search and copy the web address at the top of your Internet Explorer, Safari, Firefox or whatever you are using.

Here are some examples of searches you can do and the link that Twitter uses:

Search for fireworks:
enter: fireworks
link: http://twitter.com/#search?q=fireworks

Search for tweets with "fireworks" and "Chicago"
enter: fireworks Chicago
link: http://twitter.com/#search?q=fireworks chicago

Search for tweets with the exact phrase "Chicago fireworks":
enter: "Chicago fireworks"
link http://twitter.com/#search?q="Chicago fireworks"

Search for tweets with the exact phrase "Chicago fireworks" and "3rd of July":
enter: "Chicago fireworks" "3rd of July"
link http://twitter.com/#search?q="Chicago fireworks" "3rd of July"

Tips on converting GWT Listeners to new Handlers

These tips all depend on using Eclipse.

Start with all the ClickListeners and do them all at once. Use Eclipse "Java Search": Search String = ClickListener, Search For = Type, Limit To = References.

For simple click situations, copy these lines:

.addClickHandler(new ClickHandler() {
public void onClick(ClickEvent event)
{

and paste them in to replace every instance of

.addClickListener(new ClickListener() {
public void onClick(Widget sender)
{

Here's an extra tip: Instead of pasting the above code from here, paste it once into one of your classes. Once you get it valid there, copy that and paste it in to replace all your listeners. When you copy and paste this way, eclipse automatically pulls in the imports for you as well.

If the sender parameter had been used, replace references to it with event.getSource(). You will probably have to cast it.

For other situations, make heavy use of auto-complete (CTRL-SPACE). For example

myObject.addCl<CTRL-SPACE><ENTER> -> myObject.addClickHandler()

myObject.addClickHandler(new <CTRL-SPACE><ENTER>) -> myObject.addClickHandler(new ClickHander)

myObject.addClickHandler(new ClickHander() {<ENTER>) ->

myObject.addClickHandler(new ClickHander() {

})

myObject.addClickHandler(new ClickHander() {
<CTRL-SPACE><ENTER>
})

->

myObject.addClickHandler(new ClickHander() {
public void onClick(ClickEvent event) {
// TODO Auto-generated method stub

}
})

Final tip: Put your cursor at the end of a listener class name (ex: new ClickListener|()) and press <CTRL-SPACE>. This will bring up the class along with other suggestions in a list. But it will also show the Java Doc for that class, which will tell you what handler(s) you should use instead. The same works for methods like addClickListener().

Publish Stories to Facebook with Templates

When using Facebook Connect or any other Facebook app to post stories to users’ walls and news feeds, Facebook provides a way to customize exactly what information will appear and how. This mechanism is called Template Bundles. This article demonstrates how to create a template step by step.  In a second article, I explore one technology for actually posting stories with this template—GWT and the facebook4gwt library.

Sign in to Facebook using your standard credentials. Navigate to http://www.facebook.com/developers/ and click your application on the right.

image

From the application, click “Create Feed Template”.

image

This takes you to a utility for creating templates. Select your application in the dropdown and click “Next”.

image

Stories can be posted to Facebook in one of two forms, "One Line Story” and “Short Story”. Each template can specify both forms. First you will be prompted to specify the “One Line Story” form. Fill in the template as desired. A sample preview is shown on the right side of the page.

image

Click “Next”. Now you are prompted to fill in the “Short Story” form. With both forms we specify tokens within the text that will be replaced with values specified when the story is posted. Tokens use the {*token*} syntax. There are some predefined tokens like {*actor*}, and you can also specify your own using any token text you like. Here I am using my own token {*headline*}.

image

Click “Next”. You can specify an optional link that appears with both template forms. Again, tokens are allowed. I am using another custom token, {*url*}.

image

NOTE: In order for the sample preview to show, Facebook requires that we specify data for all custom tokens in the “Sample Template Data” box. You can see that I added “headline” and “url” here. This does not affect our template at all, just the preview we see on this screen.

image

Click “Next”. A final preview is shown. If you’re happy with your template, click “Register Template Bundle”.

A confirmation popup appears with the ID number of the template. You will use this number to reference this template when making posts. Don’t worry about copying it down if you don’t need it immediately; you can always look it up later.

image

That’s all there is to it. You can now use any of the Facebook APIs to post stories using your template. In another article I explore an example of this with a GWT application, taking advantage of the open source facebook4gwt library.

Integrate your GWT app with Facebook in 4 easy steps

Step 1: Register you app with Facebook.

Sign in to Facebook using your standard credentials. Navigate to http://www.facebook.com/developers/ and click “Set Up New Application.”


Enter a name for your application.


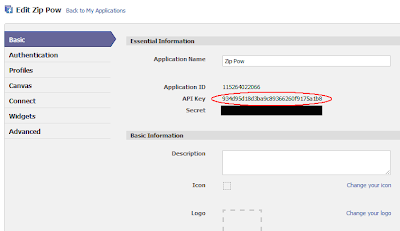
Make note of your API Key. You will need this later. You can come back to this page any time to get it.


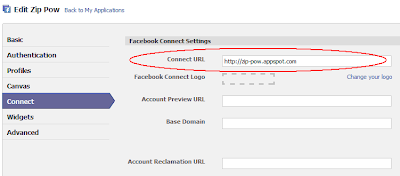
Click the “Connect” section on the left. Then enter the base domain name of the website where your application is hosted into the “Connect URL” field. Click the “Save Changes” button at the bottom of the page.


That’s it. You are now the proud developer of a Facebook application, which is required for using Facebook Connect.

Unlike most of the Facebook applications we are used to seeing on the Facebook site, our application does not have an interface for users on the Facebook site. This is something you could certainly add it you need it, but it is not necessary when using Facebook Connect.

Step 2: Add the facebook4gwt JAR to your project .
Go to http://code.google.com/p/facebook4gwt/. Click “downloads” and grab the latest JAR.

Add the JAR to the build path of your GWT project. I’m using an Eclipse project and building it with the Google Eclipse plugin. So I just go to the configure build path dialog, click “Add JARs…” or “Add External JARs…” and select the JAR I just downloaded.

Now add the following line to your module XML file to tell it to include the facebook4gwt module.

<inherits name="com.reveregroup.gwt.facebook4gwt.Facebook4gwt"></inherits>

Step 3: Initialize Facebook Connect.

Facebook Connect needs to be initialized on your web page before using any of its features.

With facebook4gwt, this is accomplished with one simple call:

Facebook.init(YOUR_API_KEY);

This is the API Key that we noted in Step 1 above.

I am making the call in the onModuleLoad() method of my EntryPoint, but you can put it anywhere as long as it comes before you try to use any of its other features.

Step 4: Use the API
Now you’re ready to connect with Facebook. Here are a few examples of what you can do.

Provide a login button
The vast majority of Facebook Connect features require a user to be logged in to Facebook through your site. The API provides a login button that can be placed on your page for a visitor to sign in. It can be used as any other GWT Widget:

loginButton = new LoginButton();
RootPanel.get("facebookLogin").add(loginButton);

Listen for login events
You can register a login listener that is fired whenever a user logs in or out:


Facebook.addLoginHandler(new FacebookLoginHandler() {
public void loginStatusChanged(FacebookLoginEvent event) {

if (event.isLoggedIn()){

statusLabel.setText("Logged in");

} else {

statusLabel.setText("No user logged in");
}

}

});

Get information about a user
The API exposes methods for getting information about the current user or any user given their numeric ID.

In this example we get the current user’s name, status and profile picture. It’s an asynchronous call, so the result is returned to an instance of AsyncCallback.

You also need to specify which information you want the call to fetch for you. These methods use varargs to allow you to easily specify as many items as you need. UserField is an enum with all the possible items.


Facebook.APIClient().users_getLoggedInUser(new AsyncCallback() {
public void onSuccess(FacebookUser result) {
userName.setText(result.getName());

userImage.setUrl(result.getPic());

userInfoPanel.setVisible(true);

}
public void onFailure(Throwable caught) {
userInfoPanel.setVisible(false);
}
}, UserField.NAME, UserField.STATUS, UserField.PIC);


Share with friends
You can add Facebook “Share” buttons to your page in various styles. Again these are just GWT widgets.

new ShareButton(URL_TO_SHARE, TITLE_FOR_POST);

A more advanced option is to post to the user’s wall using templates to customize exactly what information is shown and how. For more on creating facebook feed templates see this blog entry.

The API works like this...

  1. Create an instance of FacebookStory and set the template bundle
    id. You should be able to find the this id with the template you created on
    Facebook's site.
  2. Set the content for your post:

    • Set any key-value pairs of data that your template needs using the
      putData(String, String) method.
    • Add the images, video, mp3 or flash data you want (if any).
    • Set bodyGeneral if desired.

  3. Optionally, configure the dialog with setPrompt() and setDefualtUserMessage().
  4. Finally, call showFeedDialog(). This will display a dialog
    window for your user to confirm the message and possibly add their own
    comments. If they approve, the message will be posted to their wall and to
    their friends news feeds.

Here is an example:

FacebookStory fbStory = new FacebookStory();
fbStory.setTemplateBundleId(Constants.FEED_TEMPLATE_ID);
fbStory.setPrompt("Add your thoughts if you like...");
fbStory.putData("headline", article.getHeadline());
fbStory.putData("story_url", Constants.APP_URL);
fbStory.setBodyGeneral(article.getContent());
fbStory.addImage(article.getImageURL(), Constants.APP_URL);
fbStory.showFeedDialog();

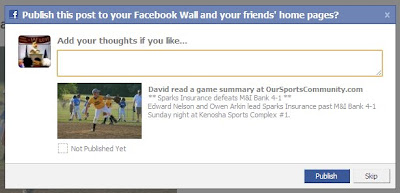
And here's the confirmation dialog displayed by this code.


That's about all there is to it. The actual Facebook API has many more features available than shown here. Over time the facebook4gwt team hopes to build more and more of these features into their implementation, so be watching for that.

Twitter inside Gmail

For me, the only service I am nearly constantly logged into is Gmail. So it made sense to use that for my twitter client.

Introducing TwitterGadget for Gmail!! (http://www.twittergadget.com/how_to_install.php)

I can now post tweets from a small box below the labels box. I can also get a view of my friends' recent posts at the click of a button.

Prevent image selection and dragging behavior

When writing JavaScript that allows images to be dragged and dropped on a web page, the browser's default drag and selection behavior can get in the way. Here are cross-browser ways to disable these default behaviors...

Prevent selection:
HTML
<img style="moz-user-select: none" unselectable="on" onseletstart="return false;" />

or JavaSript
function preventSelection(element) {
element.style.MozUserSelect = 'none';
element.unselectable = 'on';
element.onselectstart = function() { return false; };
}

Prevent drag for images and links:
HTML
<img onmousedown="return false;" ondragstart="return false;" />

or JavaScript
function preventDrag(element) {
element.onmousedown = function() { return false; };
element.ondragstart = function() { return false; }; //I.E.
}

How to publish Javadoc on Google Code

  1. Upload the javadocs to the google code svn repository for the project.
  2. Change the MIME type of these javadoc pages from text/plain to text/html and text/css. This is done with subclipse (in Eclipse) as follows
    1. Right-click the folder that contains the javadocs. Select [Team] -> [Set Property...].
    2. Name: "svn:mime-type", Value: "text/html".
    3. Select "Set property recursively" and click OK.
    4. Set the property for the individual css file in the same way to "text/css".
  3. Commit the changes to the svn repository.
  4. In Google Code, browse the project source to the index.html of the javadoc.
  5. Select "View raw file". Just link to that URL as your published Javadoc.

I got all my information here:
http://stuffthathappens.com/blog/2007/11/09/howto-publish-javadoc-on-google-code/