Slack Slash Commands with AWS Lambda

Introduction

Incorporating Lambda functionality into your Slack opens endless possibilities for automation. 

The commands may provide a quick method to store the information such as "/todo" and "/memo" as well as very sophisticated methods to "/deploy" some code, or "/reserve" assets. 

With some additional work, the commands such as "/predict" or "/classify" could call on machine learning models. 

The options are truly unlimited and can serve your team, or you individually. 

If you constantly add the new automation skills to your repertoire,  it is going to give you that extra "edge" in the hyper-competitive world.

For ideas on constantly building your set of skills, read my article on Singularity on Medium.com.


Basic Architecture


  • The individual user, or a team, interact with the Slack client app or website.
  • The particular Slack team is identified by a unique token
  • The commands are identified by a leading /slash
  • The AWS API Gateway is able to provide:
    • monetization for the API
    • DDOS attack protection
    • throttling the frequency of received API calls
  • There can be an AWS Lambda function to verify the token and delegate tasks which might limit the security exposure of the system
  • AWS Lambda functions fulfill a very particular skill and connect to other AWS services or APIs as needed. 
  • Over many years you can have thousands of skills that you could progressively perfect and monetize 


Cost Considerations


  • AWS API Gateway costs $3.50 per month per million requests. The first million is free.
  • AWS Encryption costs about $1 per month


Create an AWS "IAM" role for this service


Create role step 1


select Lambda


Create role step 2a


Search and select "AWSLambdaBasicExecutionRole"


Create role step 2b


Search and select "AmazonDynamoDBFullAccess"


Create role step 3


Name the role


Go to the Slack you are an ADMINISTRATOR for:
e.g. https://ukidlucas.slack.com/apps

Search for "Slash Commands"


https://ukidlucas.slack.com/apps/[....]-slash-commands

It should display something like:


Click "Add Configuration"

Choose a Command: "/HelloWorld"

Click "Add Slash Command Integration"

From the "Outgoing Data" copy token=LONG_ALPHA_NUMERIC

Save the token value for next step.


Open AWS new Lambda with "slack-echo-command-python" blueprint

You can search and navigate to this blueprint, or click the link below.


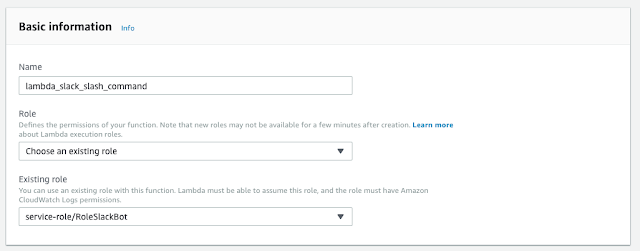
Lambda Function: Basic Information


Updating "Execution Role"


  • At first, the created role was not available, but later when I edited the Lambda Function it showed up:


Lambda Function: Slack Token


  • Paste the previously saved Slack token


Configuring Triggers: API name


Save the Lambda Function


  • Click on the "API Gateway" trigger block
  • Copy the API endpoint URL 
  • Paste that URL into the Slack 
  • Save the Slack Configuration


Try Calling the /helloworld from Slack

slackbot [10:12 AM]
Darn - that slash command didn't work (error message: `502_service_error`). Manage the command at text.

Go to AWS CloudWatch (your logs) by clicking Monitoring

https://console.aws.amazon.com/cloudwatch/


You can see that the initialization error has occurred having to do with Encryption


The extra level of encryption using KMS:


Set the token value as the "kmsEncryptedToken" value

Create Customer Master Key (CMK):


References


ebooks


Having been a long-time user of Kindle and Nook, I end up using Google Books most of the time, here are some reasons:

  • Amazon Kindle does not support ePub which is a most common format
  • Barnes and Noble Nook does not allow to upload new books to the cloud and from there to the Nook via WiFi
  • Only Google Books allow reading the text using the Android system voice (TTS)
  • For Google Books adding newly purchased books is as simple as clicking "Upload files"


To manage my eBooks I use:

android-adb


It is frustrating when you cannot connect to ADB.

Here is a list of troubleshooting items:

Developer Options - ADB

The first one is obviously enabling ADB in Settings > Developer Options

USB role


The USB role for ADB should be the "Device", your computer is the "Host".


  • Device
    • this device is powered by the USB
    • this device can send ADB data to the Host
  • Host Mode
    • this device powers the USB
    • this device sends and receives the data
  • Accesory - this device cannot be a "Host", but acts like one
    • this device powers the USB
    • this device sends and receives the data


Correct DATA USB cable (and hubs)


This one gets me the most often, once you verify that the USB cable works label it.
The same goes for any hub or USB C to USB A converter.


References


TensorFlow-serving


TensorFlow Docker Serving


Android Vendor Testing Suite (VTS)


Android Vendor Testing Suite (VTS)


Machine Learning Supervised Speaker Recognition (Diarization)

References:

https://arxiv.org/abs/1810.04719

https://github.com/google/uis-rnn

https://catalog.ldc.upenn.edu/LDC2001S97

Setting up the Raspberry Pi with a 7-inch touchscreen

Overview


In this tutorial, I will show steps for setting up the Raspberry Pi 3B with a 7-inch touchscreen. Later, I will add a dual camera support. As usual, I am doing most of the work on the MacBook Pro, but the steps will easily translate to another operating system (Windows, or Linux).

I have ordered the touchscreen display a while ago and it's been sitting on my bench, but right now I am working on the image recognition in my car (a separate tutorial) and I would like to see what I am capturing, also to be able to start and to stop the process from a touchscreen.

I have ordered the case for the setup, but I have to see how it would work for me as I need a stereo (or rather dual) cameras that will require an additional pair of Raspberry Pi boards. I do not believe that Pi Zero will do, as I will do a heavy pre-processing of the images before sending them to the Machine Learning model.


There is also a 10.1-inch (1280x800) capacitive touchscreen available, but this might be for the next stage of the project.

The products mentioned are shown below:


Raspberry Pi 3B 7-inch touchscreen 7-inch case 10.1 touchscreen Infrared camera


Download SD Card Formatter for Mac


https://www.sdcard.org/downloads/formatter_4/eula_mac/index.html


Format the SD card


Download Raspbian with Desktop


https://www.raspberrypi.org/downloads/raspbian/


UZip the Rasbian OS and you get .img

2018-10-09-raspbian-stretch.zip
2018-10-09-raspbian-stretch.img

Check where is your SD Card mounted

$ diskutil list
/dev/disk2 (external, physical):
#: TYPE NAME SIZE IDENTIFIER
0: FDisk_partition_scheme *15.9 GB disk2
1: Windows_FAT_32 PI3_RASBIAN 15.9 GB disk2s1

Unmount your SD Card


$ sudo diskutil unmountDisk /dev/disk2
Password:
Unmount of all volumes on disk2 was successful

 Put the image on the SD Card


$ sudo dd bs=1m if=/Users/uki/Downloads/2018-10-09-raspbian-stretch.img of=/dev/disk2
3944+0 records in
3944+0 records out

4135583744 bytes transferred in 3019.441172 secs (1369652 bytes/sec)

Wait a long time with no feedback.

Eject the SD Card


$ sudo diskutil eject /dev/disk2
Password:

Disk /dev/disk2 ejected

Insert the SD Card into the Raspberry Pi

Make sure you insert the SD Card correctly, the slot is under the Display ribbon.

Connect pins


  • --- RED 5V
  • --- BLACK Ground
  • --- GREEN (serial data) - SDA1 I/O I2C bus
  • --- YELLOW(system clock) - SCL1 I2C bus

The pin layout for Raspberry 2 and 3 is the same.


References:


TuriCreate: display images in Jupyter notebook instead using explore() method

When using TuriCreate in a Jupyter notebook, explore() method for images does not work very well. I created a helper method that shows me the images and their labels.


# shorthand
# sframe[3]['image'].show()

# image_testing_SFrame[0:5]['image'].explore()
sframe = image_testing_SFrame[0:5] # show first 5 records

def show_images(sframe, image_column="image", label_column="label"):
    for subset_dictionary in sframe:
        image = subset_dictionary[image_column]
        print(subset_dictionary[label_column])
        image.show()
show_images(sframe, image_column="image", label_column="label")
show_images(sframe)
 

TuriCreate: SFrame filter_by()

Create a subset SFrame by filtering a bigger SFrame


Filter using a single string


dogs_SFrame = image_training_SFrame.filter_by(values="dog", column_name="label", exclude=False) 
print(dogs_SFrame["label"][0:15]) 
['dog', 'dog', 'dog', 'dog', 'dog', 'dog', 'dog', 'dog', 'dog', 'dog', 'dog', 'dog', 'dog', 'dog', 'dog']


Filter using an array of strings


animals = ["dog", "cat", "bird"] 
animals_SFrame = image_training_SFrame.filter_by(values=animals, column_name='label', exclude=False) 
print(animals_SFrame["label"][0:15]) 
['bird', 'cat', 'cat', 'dog', 'bird', 'dog', 'bird', 'bird', 'cat', 'dog', 'cat', 'bird', 'cat', 'cat', 'dog']


Example:

training_sframes = {}
for label in unique_labels:
    #print (label)
    training_sframes[label] = image_training_SFrame.filter_by(
        values = label,
        column_name = "label",
        exclude = False)
   
for key_name in training_sframes: # dictionary training_sframes
    print(key_name)


TuriCreate: Find unique records in a SFrame

Find unique records in a dataset (SFrame)


labels_column_SArray = SFrame_DataSet['label']
print(type(labels_column_SArray))
unique_labels = labels_column_SArray.unique()
print(unique_labels)
['bird', 'dog', 'cat', 'automobile']


multi_cam_pi

https://www.pyimagesearch.com/2016/01/18/multiple-cameras-with-the-raspberry-pi-and-opencv/

Fabric Python library to run SSH to multiple computers

Fabric Python library can be used to send SSH commands to multiple computers at the same time.

This comes useful when doing distributed updates to the SBC (i.e. Raspberry Pi) cluster.

http://www.fabfile.org/


A very BIG ML dataset un-TAR GZIP command

I have learned that none of my GUI Mac programs were able to expand the 13 GB dataset, however, the command line had no problem with it.


$ tar xvzf BIG_DATASET_MANY_THOUSANDS_FOLDERS.tar.gz

It would be great is it was this simple!

The command has failed as I run out of 41 GB of free disk space before I was able to expand it.

Alternatively, I considered going one directory at the time,

$ tar xvfz BIG_DATASET_MANY_THOUSANDS_FOLDERS.tar.gz /directory_path


with a script that traverses the directories. This way I can keep track which directories were correctly expanded.

At this point, I ended up with multiple directories on various disks, a directory merging tool is very useful:

# parameters:
# -a --archive; look at everything recursively
# -i; --itemize-changes; print update about each file
# -h; --human-readable
# -W; --whole-file; avoid file deltas
# --progress; show progress in terminal
# --log-file=XYZ.log; log the progress to file, this might be useful when resuming
$ rsync -aW source_directory/ destination_directory/


References:

  • https://www.thegeekstuff.com/2010/04/unix-tar-command-examples/
  • https://medium.com/@sethgoldin/a-gentle-introduction-to-rsync-a-free-powerful-tool-for-media-ingest-86761ca29c34


Re-installing Anaconda for TuriCreate environment

Recently, I run out of disk space and had to move my Anaconda to a disk with more room.

I had a bad experience with moving the anaconda3 folder, so I opted to do a full installation.

1) Download Anaconda installer


Usually, I grab the newest version 3, but truthfully, TuriCreate still uses old python-2.7.15.

https://www.anaconda.com/download/#macos

Install it in the new location following GUI screens.

2) Back up your existing conda env

If you have an environment that you want to preserve, you can save its configuration to a small yml file.

$ conda env export > environment_turi_20181105.yml

3) Delete the previous location of Anaconda


rm -r .... /anacondaX/

4) Restore the conda evn from yml file

I provided you my yml file for convenience.
conda env create -f environment_turi_20181105.yml

5) Change to that conda env


$ conda activate turi


and make sure conda env is correct:

$ conda env list
# conda environments:
#
/Users/uki/.julia/conda/3
/Users/uki/.julia/packages/ORCA/uEiWT/deps
base /anaconda2
turi * /anaconda2/envs/turi

6) Re-install Jupyter Notebook kernel


python -m ipykernel install --user --name turi --display-name "Python 2.7 (turi)"

7) Start Jupyter Notebook and test 


$ jupyter notebook


Installing Turi Create on Python 3.6 Anaconda Environment

Installing TuriCreate on Python 3.6 Anaconda Environment

1) Check what Python version Apple Turi Create supports


Turi Create requires:
  • Python 2.7, 3.5, 3.6

2) Switch to Python 3.6 environment

$ source activate py36


$ conda env list
# conda environments:
/Users/uki/.julia/conda/3
/Users/uki/.julia/packages/ORCA/uEiWT/deps
base /Volumes/DATA/anaconda3
py2 /Volumes/DATA/anaconda3/envs/py2
py36 * /Volumes/DATA/anaconda3/envs/py36

3) Find TuriCreate v5.1.0 package

Browse: https://anaconda.org/derickl/turicreate

$ conda install -c derickl turicreate

4) Install Jupyter Notebook kernel conda module 


$ conda install ipykernel

5) Make sure all the packages are matching and updated

$ conda update --all

6) Install Jupyter Notebook kernel with this Environment


python -m ipykernel install --user --name py36 --display-name "Python 3.6 Turi (env py36)"
Installed kernelspec py36 in /Users/uki/Library/Jupyter/kernels/py36

7) Backup your Environment

Just because things go wrong all the time.

$ conda env export > environment_py36_20181102.yml

8) Start Jupyter notebook


$ jupyter notebook


Test Turi in Jupyter Notebook


import turicreate as turi
WARNING: You are using MXNet 1.2.1 which may result in breaking behavior. To fix this, please install the currently recommended version: pip uninstall -y mxnet && pip install mxnet==1.1.0 If you want to use a CUDA GPU, then change 'mxnet' to 'mxnet-cu90' (adjust 'cu90' depending on your CUDA version):


(py36) $ pip uninstall -y mxnet && pip install mxnet==1.1.0